If you provide seeds with soil, sun, water and air, you can get almost anything to grow! The preschoolers at our elementary school have had success with this. You can do it, and I’ll share a few tips to help you get started! Some things are easier to start from seed than others, and I will admit, I still cannot get cactus seed to grow! If you want to have produce and herbs grown in your backyard, on your patio or in your window sill this post is for you!
Why are Zones Important
It’s time to think about starting your plants indoors to get a head start of the cold winter months that are still in store for you Midwesterners. In order to know what you can grow, you need to understand what zone you are in. A zone, more formally known as a “Plant Hardiness Zone” is a guideline that tells you what you can generally grow in your area. Most of Iowa is 4a-5b. That means that I cannot grow things that are in zone 10 or 11 unless I plan on bringing them inside for the winter, and even then, they might not make it because Iowa is too cold.
How to Read a Seed Package
When you want to start your own vegetables from seed you should know a few things about how to read the seed package they come in. So, let’s look at an example of a seed package, or in this case, it’s online at Seed Savers Exchange, and talk through what you see.
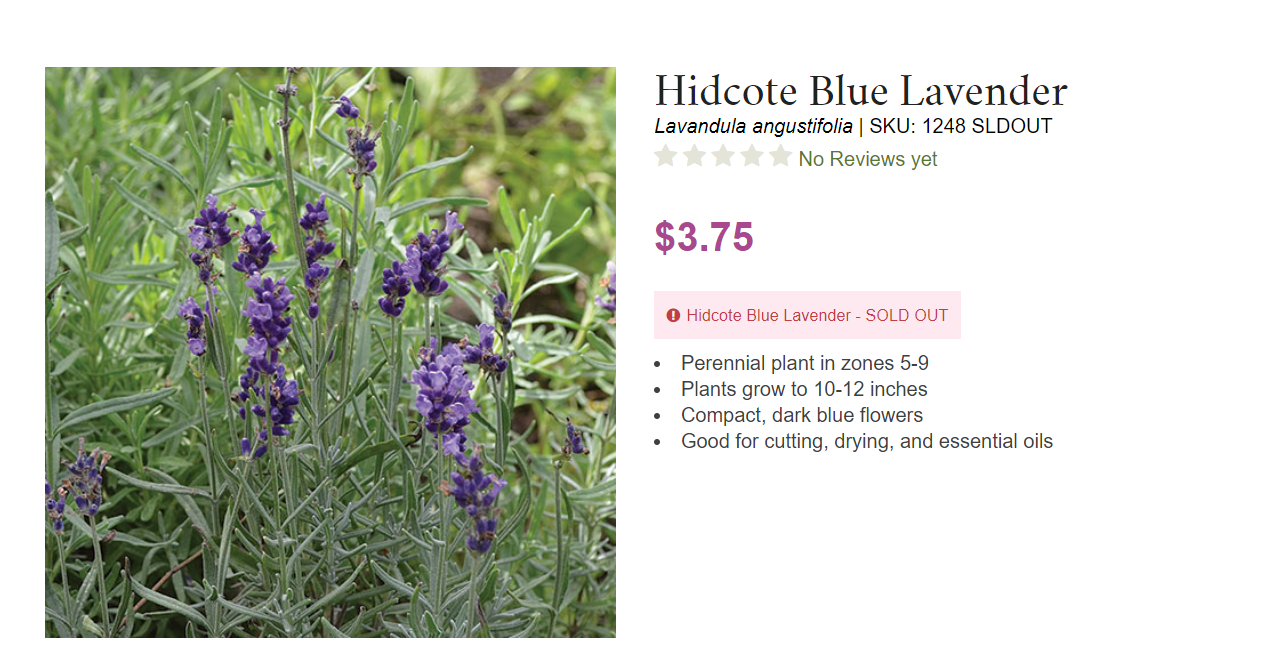
Hidcote Blue Lavender is the common name of the plant you would see at the store. Lavandula angustifolia is the scientific name. Lavandula is the genus name, angustifolia is the family name. If you remember back to biology class (which I don’t really!) this is the way biologists label taxon (singular) taxa (plural). A taxon is a group of one or more populations of an organism that form a unit. So from largest grouping to smallest it goes: Domain, Kingdom, Phylum, Class, Order, Family, Genus, Species, Variety. Here’s a way to remember the classification: Dear King Phillip Came Over For Good Soup.
There’s your science lesson for the month 😉 Next, the seed package tells us that it is a “Perennial plant in zones 5-9.” The term perennial means that the plant should come back each year in your zone, without much, or any intervention. Whereas annual means that it grows once, and dies back. Here’s where you may need to know your zone. In the case of Iowa growers, and for this plant, Hidcote Blue Lavender, if you are in a zone five or lower (1a-4b), it is likely that this variety of lavender will not come back the following year. it is too cold for it to make it through the winter here.
Ok, now that you know that information you’re probably wondering what vegetable seed do I start outside and what do I wait and plant directly outside?
Here is a list of what I like to start indoors:
- Tomatoes
- Peppers
- Cabbage
- Kohlrabi
- Herbs
Here is a list of what I like to plant directly outside (pretty much everything else):
- Pumpkins
- Gourds
- Squash
- Melons
- Cucumbers
- Beans
- Corn
- Peas
- Lettuce/spinach/arugula
- Carrot
- Garlic (the fall before)
When to Start Planting your Vegetable Seeds Indoors
For planting indoors I recommend starting around Valentine’s Day, and spacing out your plants every two weeks. By starting your vegetables from seed this way will allow you to lengthen and stagger your harvest out in the summer. I like to set a note in my Google Calendar for Fridays. Planting for me is fun, why not start out the weekend on a high note with your fingers in the dirt?!
What Equipment do you Need to Start your Own Seed
When it comes to starting your vegetables from seed you don’t have to be fancy with what vessel you are planting it in. To save on the amount of soil you use, and to help ensure success, I highly recommend planting in something like these Standard Cell Insert-48 cells (plug trays) because they fit into the Standard 1020 Flat with Holes (flat) and the Standard 1020 Flat-Standard Web Heavyweight. Seedlings (the baby plant that emerges out of a seed) like to be damp, but not dripping with water when getting their start. In order to make sure they stay this way I recommend using something with drainage holes.
You can use something you already may have like milk cartons from school, plastic drinking cups, pop bottles, etc., as long as you put in some drainage holes in the bottom. Just grab a nail or screw and put five to ten holes in the bottom of your vessel. I reuse the linked plug trays and flats from year to year as long as my plants didn’t have any sign of disease when planting. If you’re worried about it, you can wash them with some dish soap, or mild bleach solution (one part bleach to nine or ten parts water). My mom always told me this in measures of “glugs” from the container. This would be about one small “glug” from your bleach container into about a half filled utility sink.
How to Choose Soil for Planting Seeds
Now let’s talk soil for starting your vegetables from seed. I have used Pro-Mix soil in two cubic foot bags from our local greenhouse that I buy from them wholesale. I usually buy 12 bags, and that will get me through our plant sale and transplanting, and any other messing around I want to do with succulents and houseplants. For the home gardener wanting to start 200 or less plants, you will just need one of these bags of soil. Many other options are on the market. I would recommend getting something with peat moss, organic matter, and pearlite. Pearlite is the little white balls you see in potting soil. It provides aeration so your soil doesn’t compact too much, and doesn’t hold too much moisture. One tip I’ve learned throughout the years is to start with damp, not dripping wet soil, to plant the seeds into. Empty part of your bag of soil into an empty tote, wet it down a bit, mix the water in until it will clump in your hand and hold its shape. If you added too much water, and when you squeeze your soil water runs out of it add some mix back in until you get it the right dampness.
Vegetable Seed Companies to Buy from
Different companies have different expertise, and things they are known for. I highly recommend buying the same kind of seed from a few different places and see which ones you like best. Then buy from the same vendor the following year to see if the quality is how you would expect. Growing plants is a slow process, but rewarding when you find a system that works for you and your family.
Some of the top companies I have purchased from for particular vegetables
- Seed Savers Exchange- Heirloom Seeds
- I have had great luck with several varieties of several different kinds of vegetables
- This is an Iowa based company, in Decorah, Iowa!
- Johnny’s Selected Seeds
- Pumpkins
- Harris Seeds
- Pumpkins
- Baker Creek Seeds
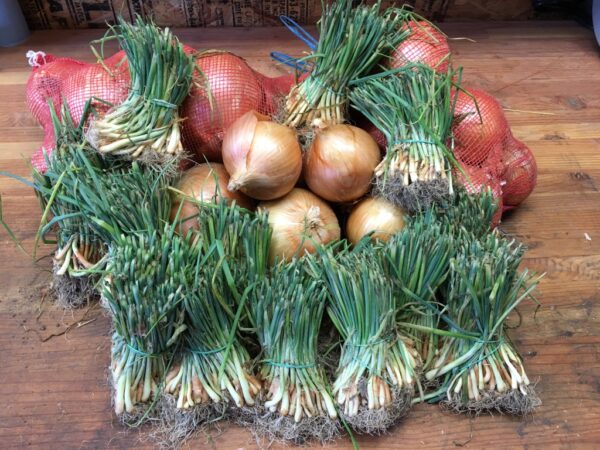
How to Start Onions
If you like to grow onions one of my gardening mentors orders onion sets for us usually the second week of January from Dixondale Farms. There is a group of us that usually go in on this order together and split the bundles of onions. This is how they come. You plant onion sets directly into warm soil. You have to wait for the danger of frost to pass, and the soil needs to be tilled and soft. Then just push the rooted end into the soil up to your last knuckle. That’s it! Weed, water, if needed, and watch them grow. I find this works better than onion bulbs because they have a little head start already.
How to Plant Garlic
If you want to try your hand at growing garlic, find someone that is selling garlic at your local farmers’ market. Garlic is usually harvested mid-late July, early August. Buy a few heads/bulbs of garlic, divide the head/bulbs into cloves and then plant the cloves. Each clove makes its own head/bulb of garlic. Plant this in the fall after the first light frost of the season. Till your soil and plant it root end down. Push it into the soil until you meet resistance, about to your last knuckle. Cover with soil and mulch. I like to mulch with shredded paper, spent leaves or straw.
How to Plant Potatoes
How Deep to Plant Vegetable Seeds
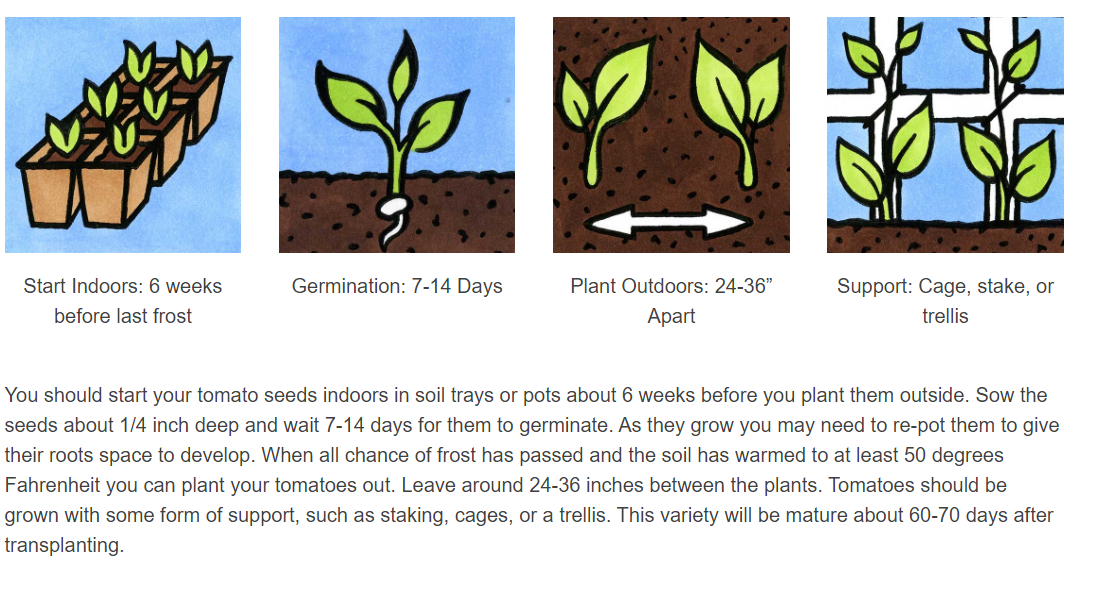
Each seed has their own planting instructions, and every gardener will tell you what works for them. However, if you’re looking back at your seed package, it may look something like this (this one is for a cherry tomato variety from Seed Savers Exchange).
On each seed package there are planting instructions, but you may not want to take your ruler with you to do your planting. When I plant with the students at our elementary school I use the “rule of knuckles.”
Let me show you how to plant your vegetables from seed using your knuckles as a guide!
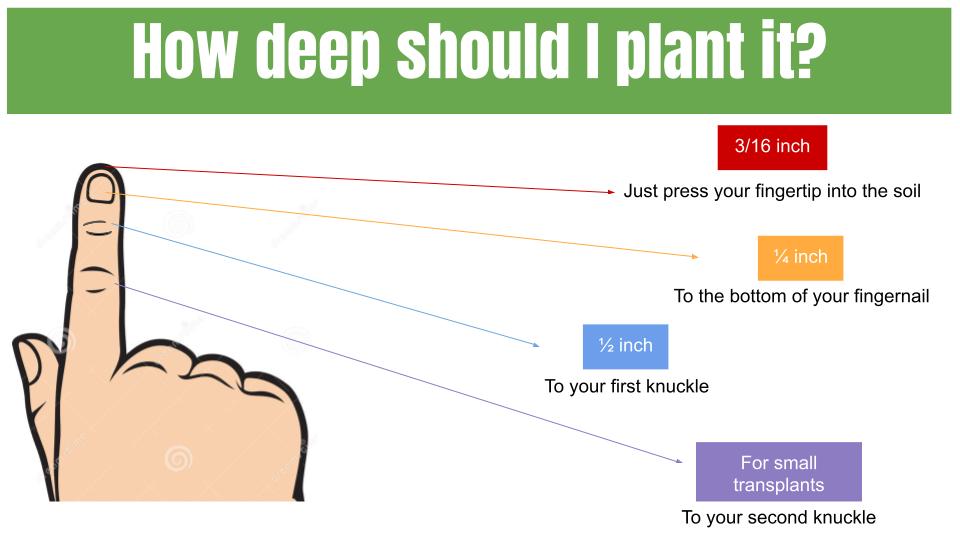
Small seeds, first knuckle. Large seeds second knuckle. Transplants, generally as deep as it was planted in the plug tray, pressed in firmly to stabilize it.
After planting seeds, push the soil in around it, and top it off with extra soil. Water it in, and you’ll be good to grow!
***Tips for Starting your own Vegetables from Seed***
- When starting seeds start with moist soil that clumps in your hand, but no water squishes out. Do not start with dry soil. When you water it the first time after planting the soil will settle down too much, and your brand new seedlings will not have room to establish great roots
- Seeds will germinate (sprout and grow) around 70 degrees Fahrenheit
- If you have access to a south facing window, plant seedlings there and rotate them 90 degrees every couple of days
- Once your vegetables, like tomatoes, are about six inches tall, put them into a cooler environment around 60-65 degrees Fahrenheit to establish a thicker stem
- If your plants develop long, thin stems, we call this “getting leggy,” they need more sunlight
- Harden off your vegetables on sunny days with minimal wind
- Take them outside to get some fresh air for a few hours. Just like you pasty people that burn in the sun easily, you need to adjust to the sunlight before going outside all day in the sun without sunscreen, plants need this too! This is known as “hardening off.” You are acclimating them to being outside, without allowing them to be beat to heck by the wind first. Do this for three to five days before planting outside
- Watch this video to see my setup at school for hardening off vegetables
- Start saving gallon milk jugs now!
- Cut the bottoms off and take the lids off of gallon milk jugs, gallon milk jugs, etc. to use them as little greenhouses for your plants. Do this especially if it’s going to be windy the first few days after planting them outside
- **PRO TIP** Save these from year to year! String twine through the handles, and hang them up in a high place out of your way, like the rafters of your garage or outbuilding
Happy planting! You can have a green thumb. If you fail, try, try again. If all else fails when starting your own seeds, reach out to your local greenhouse for plants. Remember, learning to plant your own food could save your life, and those around you. You can do this!!
Join the email list, “The Dirty Fingernail Club” for updates.
Please contact me if you have questions, I will try to help!
Leave a Reply